New Blog Features and Design
This is somewhat unusual post topic: about this blog itself. In the last few days i completely rewrote this website basically from scratch, with many more features and improved design.
Introduction
My blog is a completely static website, built with jekyll and hosted on Github pages, it gets updated automatically after every commit/push into the git repo. It all started in May 2018, now about 2 years ago. I wanted to get it quickly up and release content, so i used the public minima theme, with almost no modifications. Only changed later the background from white to grey, to make it a bit darker.
Why not keep the old?
I didn’t like the style anymore, it looked a bit outdated in my opinion. Also Mininma is a really simple theme, so there is not much besides a post list and the actual post text. Other blogs inspired me to add useful features to the site, like tags, table of contents, comments and dark mode.
Features
Following an overview of the new features and how they are implemented.
Layout
Because of most people reading this on a widescreen i have a added the navigation bar on the side. Normally it is always open, if there is enough screen width, the limit is defined in css media queries:
$mobileLimitW: 980px;

@media (max-width: $mobileLimitW) {
  // Hide nav
  #navigation:not(:target) .site-nav {
    left: -$navW;
  }
  ...
}
So on mobile this gets hidden and can be opened with the hamburger menu. It does not use any JS, the hamburger is a link that targets #navigation. The magic happens in CSS with the :target selector that changes the left property of the sidebar. A more detailed description is in this post from Mark Caron.
Tags
There is now a site wide tags page and clickable tags are on every post. Screenshot:
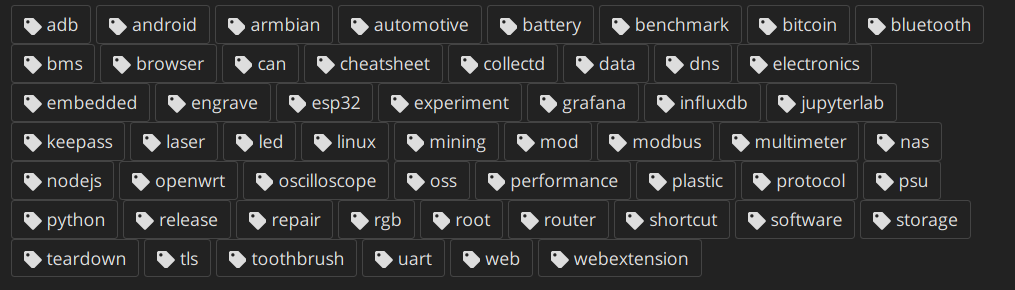 You can use it the to find more posts on a specific topic.
These are generated with a usual liquid snippet:
You can use it the to find more posts on a specific topic.
These are generated with a usual liquid snippet:
{% comment%}
  Here we generate all the tags.
{% endcomment%}

{% assign rawtags = "" %}
{% for post in site.posts %}
  {% assign ttags = post.tags | join:'|' | append:'|' %}
  {% assign rawtags = rawtags | append:ttags %}
{% endfor %}

{% assign rawtags = rawtags | split:'|' | sort %}

{% assign tags = "" %}

{% for tag in rawtags %}
  {% if tag != "" %}

    {% if tags == "" %}
      {% assign tags = tag | split:'|' %}
    {% endif %}

    {% unless tags contains tag %}
      {% assign tags = tags | join:'|' | append:'|' | append:tag | split:'|' %}
    {% endunless %}
  {% endif %}
{% endfor %}
Table of Contents
On every post there is now the table of contents in the nav sidebar, you can also click to jump directly to the corresponding heading:
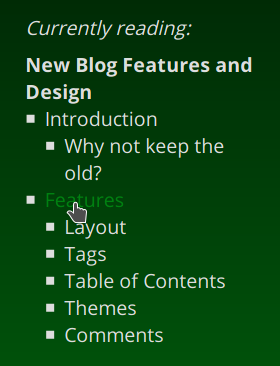

Links are simple targets on the header IDs. The current target gets highlighted with an an arrow.
Smooth scrolling works also entirely with CSS:
html {
  scroll-behavior: smooth;
}
This part gets statically generated from jekyll, with the awesome jekyll-toc, a single included file written simply in liquid.
To get the heading the include needs the post html content as input, so i included it in the post layout, but saved (capture) the output to a variable toc_html:
{% capture toc_html %}
  {% include toc.html html=content class="toc-content" %}
{% endcapture %}
So i can pass it to the the navigation sidebar include:
{%- include navigation.html toc=toc_html title=page.title -%}
Whis uses the include variable like this
{%- if include.toc -%}
    <nav class="toc">
        ...
        {{ include.toc }}
    </nav>
{% endif %}
Themes
To make it more pleasant to read at night (for all the geeks out there, including myself ;) the default theme is now dark!

If you still prefer bright themes (how dare you) that is also possible with the theme selector on the bottom the nav panel. Just select bright or dark option. In addition it is possible on both themes to customize the accent color, with the selector on the left, it will show the system/browser color selector (an input type="color"):
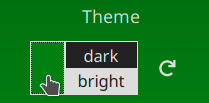
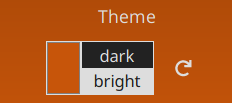
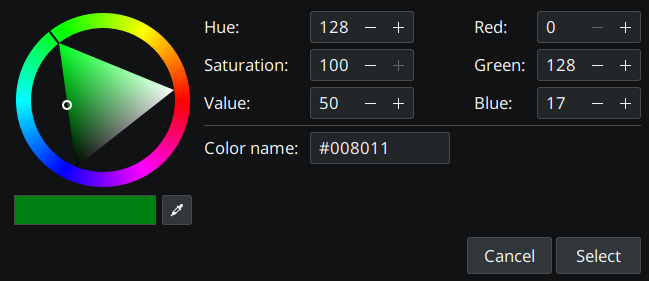
The settings are automatically saved in localStorage of your browser. It is possible to delete all custom settings with the reset button on the right. This is actually the only part that requires JS on this site, otherwise it is pure HTML+CSS. Color changes get applied through a CSS custom property (also called CSS variables):
// Defined for the whole doc
:root {
    --accent-color: #008011;
}

// Used like this
a:hover {
    color: var(--accent-color);
}
// etc...
Comments
Finally its possible to directly comment under any posts! You can see it in action below. It is based on GitHub issues, so you need to authorize your GitHub account with the utteraces service (or go on the repo/issues and comment there).
Implementation was fairly straight forward, just included the script. One shortcoming is that it needs sometimes a while to completely load and there is no builtin option to show a loading spinner. So i used the trick with a svg in the background at a fixed position, after the comments are loaded it is invisible because they are on top (higher z-index).
Utterances does support dark and bright themes. Switching is also possible with postMessage, i wrote this function:
function selectCommentsStyle(theme) {
  console.log('Set comments theme')
  const commentsTrans = {
    "default/dark": 'github-dark',
    "alt/bright": 'github-light',
  }
  if(!(theme in commentsTrans))
    return false

  const message = {
    type: 'set-theme',
    theme: commentsTrans[theme], // 'github-dark', 'github-light', etc..
  };
  const iframe = document.querySelector('.utterances-frame');
  if (iframe != null) {
    iframe.contentWindow.postMessage(message, 'https://utteranc.es');
  }
The checks for null are required because it runs while the comments might be still loading, to restore the theme settings.
This wraps it up, let me know what you think in the comments!